POVERA CUCINA

Povera Cucina celebrates the rich tastes of Italy's humble pantry.

Showing posts with label garlic. Show all posts

Thursday, May 8, 2014

AGLIO, OLIO, PEPERONCINO


Photo credit
Italian food is a normally a slow cuisine. Hand-shaped pastas. Stove-top braises. Day-long sauces.  But, when I was studying in Florence, my friend Antonio introduced me to one of Italy's easier recipes: aglio, olio e peperoncino. Garlic (aglio) and chili (peperoncino) get sauteed until fragrant in olive oil (olio).  This trinity is then tossed with a heap of hot spaghetti.

Purists will make this sauce with just those three ingredients. To jazz it up, you can also dress the oil-slicked spaghetti with a handful of chopped parsley or pan toasted breadcrumbs.  This is flavorful food for the kitchen clueless.

INGREDIENTS:

* 4 cloves of garlic (or more to taste), roughly chopped
* 3 dried peperoncini or 1/2 tsp. or red chili flakes
* 1/4 cup - 1/3 cup of extra virgin olive oil
* 16 oz of dried spaghetti

OPTIONAL ADDITIONS:
* 1/2 cup of flat-leaf parsley, roughly chopped
*1/3 cup of grated parmigiano reggiano 
OR
* 1/3 cup of  pan-toasted breadcrumbs


Bring a large pot of salted water to boil.  Pour in the spaghetti once the water boils,  cooking for 9-10 minutes until al dente.  Meanwhile, roughly chop the peeled garlic and peperoncini.  While the pasta is cooking, heat the olive oil in a large skillet over medium.  After 2 minutes of heating, add garlic to the oil. Stir frequently, sizzling the garlic until it starts to brown.  This will take around 2 minutes.

Mix in the peperoncini or red pepper flakes into the oil.  Cook the garlic and chili for another 30 seconds -- no stirring.  Before straining the pasta, pour 1 ladle-ful of starchy pasta water into the garlic-chili-oil slurry.  Turn the heat to medium-high and bring this liquid to a boil. When it begins to bubble, lower the heat to a simmer. Cook the liquid for 5 minutes, allowing the browned garlic and chili to hydrate and soften in the water.  Remove the liquid from the heat after 5 minutes

Strain the spaghetti and then pour it into the skillet with the garlicky water.  Toss the pasta and the liquid, coating all of the spaghetti.  If you'd like, you can add the chopped parsley or grated cheese at this point.  Be sure to re-toss the pasta if you add herbs or parmigiano. Let the pasta sit at room temperature for 3-5 minutes; this will give the pasta time absorb some of the flavored liquid. (If you'd prefer to add a bit of crunch, dress each bowl of pasta with a tablespoon or two of toasted breadcrumbs; you can read about making pant-toasted breadcrumbs here).

Friday, April 27, 2012

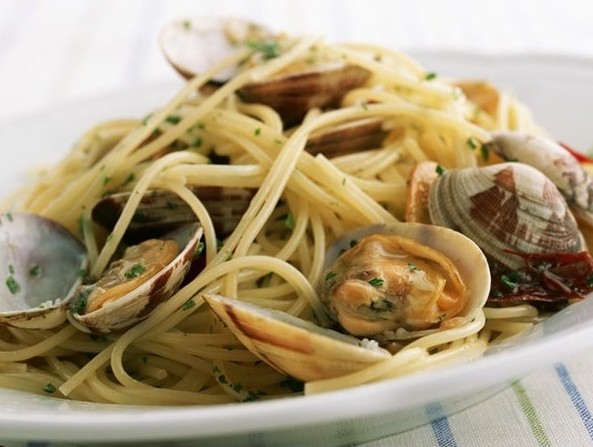
SPAGHETTI & CLAMS

     
Italy is touched on most sides by the sea.  Unlike more landlocked countries, no one region lays claim to seafood preeminence; all prize fish, squid and shrimp.  It's not the presence of seafood that sets these regions' cuisines apart.  It's how that seafood gets prepped.     

While Venetians steep sardines in vinegar and onions, Sicilians stew them with raisins.  Neapolitans slow-cook octopus in tomatoes but, moving north to Liguria, you find the eight-legged critter boiled with potatoes and a squirt of lemon.

In Naples, spaghetti with clams is a classic dish - clams, olive oil and garlic.  Fresh clams are the key to a tasty sauce.  Once cooked, the clams open and release their juice; this liquid adds an "oceany" complexity to the final sughetto.  Spicy red pepper compliments the mollusks' briny taste.

INGREDIENTS:
* 1.5 - 2lbs of live manilla clams, in their shells
* 8 oz spaghetti, cooked al dente
6 tablespoons of olive oil
* 2 garlic cloves (or less; depends how "garlicky" you want it), sliced thin
* Red pepper flakes, to taste 
* 2 tablespoons flat-leaf parsley, rough chopped


Scrub the clams, removing any sand still on the shells. Place the clams in a bowl and cover with water.  Let the clams sit in the water for 20 min.  The clams will expel whatever sand is inside, guaranteeing your meal is not a gritty mess.  

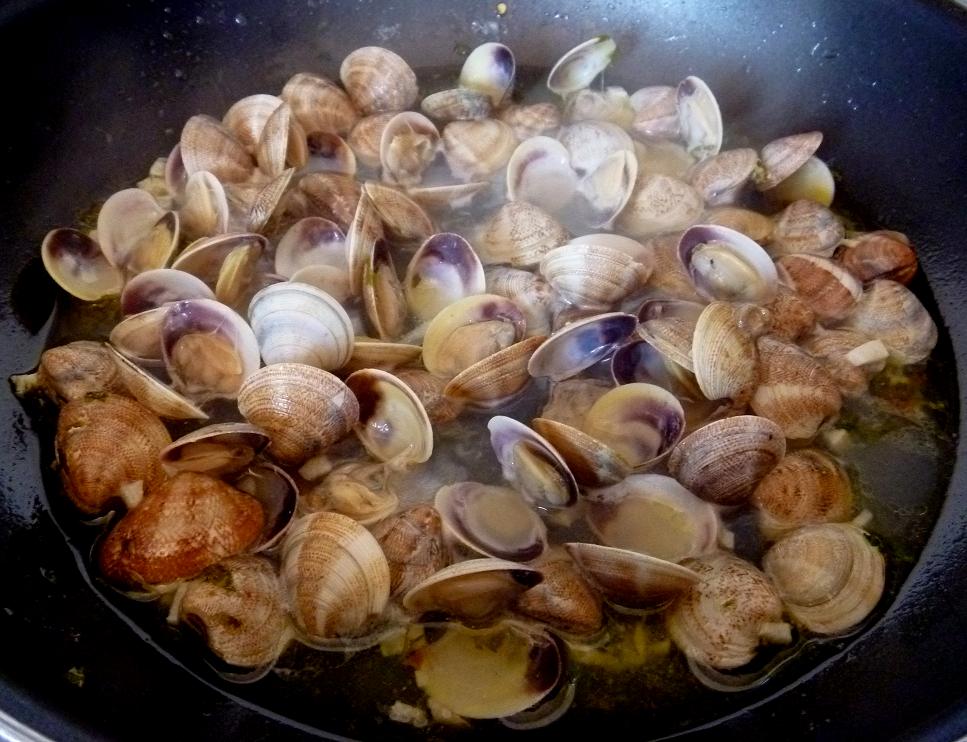
Heat a dutch oven over medium.  Do not add any oil yet.  Put the clams in the hot pan and cover for 3-4 minutes.  During this time, the clams should open up and begin releasing their juice.

Clams with shells open after cooking. Photo from: http://savourbcn.files.wordpress.com
When they've opened, you can either keep the clams in their shells or toss out the shells.  Remove the clams / juice from heat and set aside.  If you choose to pull the meat from the shells, do not pour out the liquid they have emitted. Pour 6 tablespoons of olive oil into a separate skillet and heat over low.  Toast the garlic / red pepper flakes the skillet until aromatic.  


Photo from www.buttalapasta.it
Once the garlic sizzles, add the conserved clams / juice to the pan with the garlicky oil.  Cover and cook the clams for 15 minutes. Cook on very low heat.  As a final step, toss the al dente pasta in the skillet with the clams, sprinkling with the chopped parsley.   

Wednesday, April 25, 2012

PASTA WITH CAULIFLOWER


Cauliflower needs more love.  Americans tend to damn it to side-dish oblivion.  Boiled to a bland mush, cauliflower loses most of its flavor.  Sadder still, what little taste is left then gets entombed in molten cheese sauce.  This recipe aims to lift cauliflower out of its Velveeta-drowned purgatory.

When pan-fried, cauliflower caramelizes.  High heat salvages the florets' crunch, drawing out the sweetness sapped by boiling.  If you hate cauliflower, give this recipe a whirl and see if you still find it icky.


In much of Rome, the cavolfiore romanesco is a comical and common sight.  Looking like a mad botanist's creation, it's sort of broccoli and sort of cauliflower. Bright green, the romanesco variety first emerged in Italy during the 1600s.  Its texture is spongy like cauliflower but, once cooked, presents a greener taste more akin to everyday broccoli.

This dish combines market-variety cauliflower and the more alien-looking romanesco.  If you can't find romanesco, plain old cauliflower is more than up to the task. Porous florets happily sop up the oil, vinegar and lemon juice dressing. 

INGREDIENTS:
  • 1 small head of white cauliflower
  • 1 small romanesco cauliflower
  • 1-2 cloves garlic, minced
  • 1 tablespoon capers
  • 1/2 lemon, juiced
  • 1 anchovy fillets, finely chopped (optional)
  • 6-8 pitted olives, chopped
  • Red pepper flakes to taste
  • 1 - 2 tablespoons balsamic vinegar
  • 8 oz of penne
Wash and core the cauliflower, keeping the individual florets intact as much as possible.  For instructions on coring a cauliflower, go here: how to cut a cauliflower.  Slice the florets in half or in quarters.  Cauliflower browns best when cut with one or more flat sides.  The flat surface will touch the hot pan and caramelize.  Uncut florets will may turn soggy and be hard to brown.


While the water is boiling, heat 3-4 tablespoons of olive oil in a flat skillet over medium-high. Depending on size, you might need more oil.  When the pan is hot (but-not-smoking), add cauliflower slivers.  Quickly stir the so that all the pieces are coated in oil.  :: Stop stirring ::.  In order to brown, the cauliflower needs to be in sustained direct contact with the hot pan.  Wait 3-4 minutes or until the cauliflower has begun to brown.  Continue cooking until browned all over.  Remove the florets and set aside.

Cook the penne in 3 quarts of salted water.   In the same pan that you cooked the cauliflower, heat another 2 tablespoons of oil.  Add the garlic, olives, capers, red pepper flakes and anchovy, stirring occasionally to avoid burning.  Cook over medium heat for another 2 minutes -- you will begin to smell the aromatic garlic and the vinegary tang of the capers.


When the garlic starts to caramelize, return the browned florets to the pan.  Lower heat and gently mix together, making sure that the garlic and olives and capers get evenly distributed.  Dress the florets at this point with the lemon juice and balsamic.  Keep cooking for 2-3 minutes over low heat -- or until the juice and vinegar have been absorbed.  Toss the cooked pasta together in the pan with the dressed cauliflower. Serve hot.  

Sunday, April 22, 2012

GARLIC BREAD TUSCAN STYLE


There are easy recipes. And, there are easy recipes --  food that  folks who struggle with Kraft Mac can make. And, make well.  Literally meaning an oiled up slice of bread, fettunta is Tuscany's bare-bones take on garlic bread.  (My high school English teachers would be horrified -- two sentences in one paragraph that start with "and").

For most Americans, just mentioning garlic bread conjures images of oven-toasted loaves doused in butter, parsley and mountains of minced garlic.  Some garlic bread leaks yellow. Some ooze gooey cheese. Others make you wonder why the bread looks like orange Kool-Aid.

While not straying far from the grease + bread + garlic equation, fettunta might better be called garlicky bread.  If American garlic bread showcases the zing of garlic and the stringiness of mozzarella, the star of fettunta is the bread.  To be sure, garlic is still here.  It's just not the main attraction -- one note in a choir rather than that voice that makes you forget all others. Since garlic won't overpower the bread, it's key that you get your hands on a quality loaf.

Raw garlic is rubbed right on top of toasted or grilled bread.  The warm surface absorbs just a hint of the garlic's punch.  You taste the bread. You taste the fruity olive oil. You taste the garlic.  No one flavor kills the others.  Served hot, this is easy and light finger food.

INGREDIENTS:
  • 1 loaf crusty bread
  • Olive oil for drizzling (1/2 cup)
  • 6 or so peeled garlic cloves
  • Salt & pepper

Slice the crusty Italian loaf into thick "bruschetta-sized" slices. Each slice should be about 1 to 1.5 inches wide.  Once sliced, flash toast (on high) the slices. If you have a grill pan or a grill, grilling the bread is the way to go.  This will endow the final dish with a rich, smoky aftertaste.  


When toasty, take a clove of garlic and rub it into the bread's rough surface.  The garlic will rub off.  Garlic up each hot slice this way.  Sprinkle with salt and pepper.  If the bread is already salted, only use a smidgin of salt. As a final step, pour a big glug of extra-virgin olive oil over each garlicky piece.  The warm bread will absorb the oil. Serve hot.


                                               This photo is from http://theitaliandish.blogspot.com


Thursday, April 19, 2012

TOMATO SAUCE


INGREDIENTS:

* Extra virgin olive oil
* 2-3 cloves of garlic
* 3 cans (28 oz) of whole plum tomatoes -- I like Trader Joe's or Muir Glen Fire-Roasted
* A handful of fresh basil and fresh parsley
* 1/2 cup - 1 cup of red wine
* Salt / pepper to taste

Sautee 2-3 whole cloves of garlic in 3-4 tablespoons of olive oil; when they start to brown, you can remove them from the oil or leave them in for a "garlickier" sauce.  Add the 3 cans of plum tomatoes to the oil that's been flavored with garlic.  Bring to a boil over medium / high heat, stirring to keep the tomatoes from burning.


Simmer plum tomatoes, olive oil and garlic over medium high heat for 10 minutes. Stir, stir, stir.


Once the sauce has started to thicken, crush any remaining whole tomatoes with a potato masher or
the bottom of a wooden / slotted spoon.  Continue simmering over medium heat while squashing the 'maters.  Crushing the tomatoes will temporarily make the sauce a bit soupy.  Simmer for another 15-20 minutes but now over low heat.  The lower heat helps develop the tomatoes natural sweetness.

If desired, add 1/2 cup to 1 cup of red wine and increase heat to medium.  The sauce should bubble and steam until most of the wine burns off.  For a lighter sauce, keep simmering but don't add any wine. Depending how "wet" you want your sauce, stir-n-simmer for another 5 minutes.  Adjust for salt and pepper.


Remove the sauce from the heat.   Pour half into a food processor and puree.  (DO NOT BLEND BAY LEAVES). Leave the rest of the sauce unblended in the covered pan.  While the sugo is blending, pour in a steady stream of olive oil -- about a quarter cup in total.  The olive oil will help the sauce to emulsify, adding a creaminess and velvety texture to your final sugo.  If you like your sauce with chunks of tomato, skip this step.  You can also add fresh basil or flat-leaf parsley to the puree.  

Combine the pureed sauce with what's in the pan.   The blended sauce will be much "wetter" than the mixture that you don't blend.  For a thicker sauce, simmer once more over medium heat for 5-10 minutes.  For a thinner sauce (good for serving tons of people), mix together and ladle out as is.  


Subscribe Now: standard